
Whether you are a current host or previous guest at VoiceAmerica, there is a good chance you have used Zoom as your video communications provider. The software has evolved immensely since the uptick of users in 2020. The company has updated its features to improve user experience and increase efficiency. In this article, we discuss how these features work and how anyone can improve their overall Zoom experience.
Zoom Avatars
Let’s say you want to record video for your radio show, but you don’t want to be on camera. A recently updated feature on Zoom allows you to choose a Zoom Avatar for your live video feed.
To create an Avatar in Zoom, follow these simple steps:
- Open the Zoom app on your device and sign in.
- Click on your profile picture icon in the top right corner.
- Select the “Settings” tab.
- Click on the “Background & Effects” button in the left hand column.
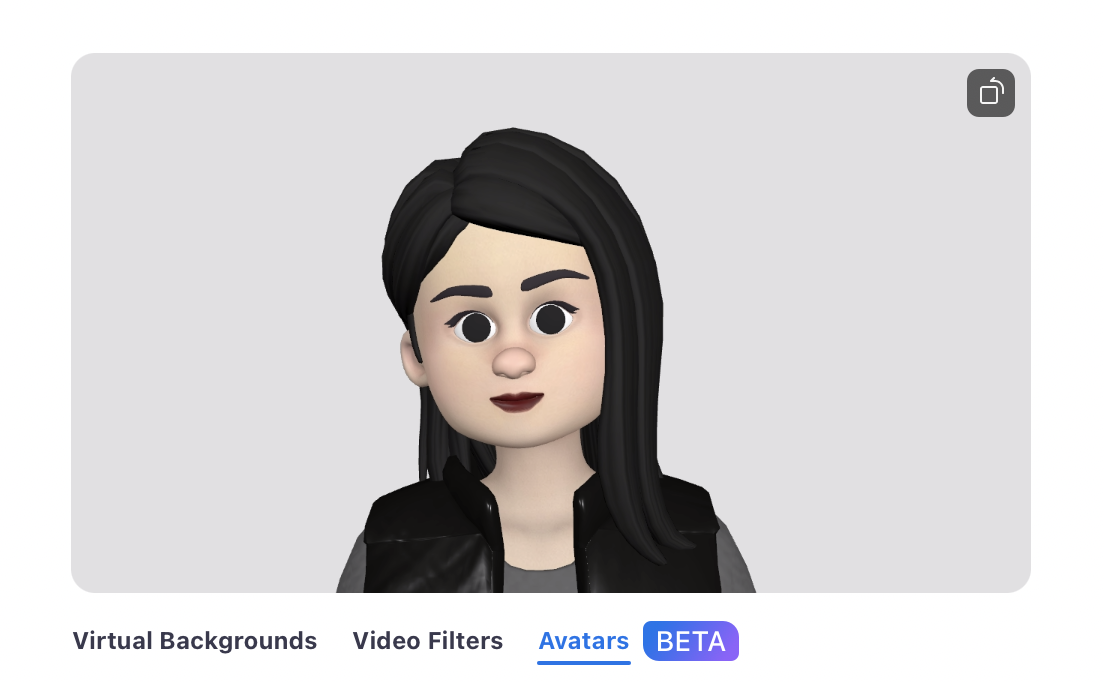
- Select the “Avatars BETA” button and click the “+” sign to create your avatar!
Once you have followed these steps, you are able to build a custom Avatar. You have the option to choose the hair color and style, eye shape and color, clothing, and more. When you are done creating the Avatar, you can select it as your virtual background during Zoom meetings. All you have to do is click on the “Virtual Background” button during a meeting and select the Avatar you created from the available options. Not only will the Avatar follow your body movements, it will follow your facial expressions as well.
The Avatar feature can be a fun and creative way for hosts to represent themselves during Zoom recordings, and it can provide a more engaging and interactive experience for your show’s audience. Our social media manager, Rachel, has tested this feature out, and she recommends that you have fun and play around with the feature.
Q&A Feature
Do you prefer live-streaming your radio show? Do you want people to be able to ask you questions live on air using the Zoom application? The new question and answer feature allows attendees of a webinar meeting to ask questions in the chat. Once an audience member asks a question, you are able to write out a response or select the “Answer Live” button. This will let everyone know that you have chosen to answer that question verbally. After the zoom session, you are able to save the questions and answers in the chat if you would like.
Follow these quick steps to enable the Q&A feature:
- Schedule a new webinar meeting and make sure under webinar options, Q&A is selected.
- Select the “Q&A” icon at the bottom of the meeting window once you have started the meeting.
- Click on the “Open Q&A” button to enable the Q&A feature.
- Attendees can then submit their questions by clicking on the “Q&A” icon at the bottom of the meeting window and typing their question into the box.
Another helpful aspect of the feature is that you are able to sort the questions by popularity or answer status, and can mark questions as answered or unanswered. This feature could be handy if you create a webinar zoom meeting and you have many interactive attendees joining the call.
Sign Language Interpreters Support

To make your radio show or podcast more accessible to a wider audience, test out the new level of support for sign language interpreters. Zoom’s Sign Language Interpreters Support is a feature that allows meeting hosts and participants to add an interpreter to their Zoom meeting to provide real-time sign language translation. This feature is exceptionally helpful for people who enjoy podcasts, but they are deaf or hard of hearing.
Follow these steps to assign a sign language interpreter in your meeting:
- Sign into your Zoom web portal and click on Meetings.
- Select Schedule a Meeting.
- Under the Interpretation section, insert your interpreter’s email and hit the save button.
- Join the Meeting you have scheduled.
- Click Interpretation at the bottom of the screen and make sure your ASL interpreter is added.
- Click “Start!”
The interpreter will receive an email with instructions on how to join the meeting and and once they join the meeting, their video feed will appear in the interpreter panel, which is separate from the main video panel.
Suppress Background Noise
If you have loud ambient noise in the environment you are recording from, there is a way to suppress the noise on your end of Zoom. Try out the Suppress Background Noise feature in your next Zoom meeting.
Here are the steps to access the Suppress Background Noise feature:
- Start the Zoom meeting and click on the “^” arrow next to the “Mute/Unmute” button at the bottom of the meeting window.
- Select “Audio Settings” from the menu that appears.
- Click on the circle next to “Zoom optimized audio” and choose what amount of “Background noise suppression” you would like to use.

The Suppress Background Noise feature will filter out background noise, such as keyboard typing, mouse clicks, and other sounds while preserving the clarity of speech and other important audio. It’s a useful tool for improving the quality of audio on Zoom.
Sometimes suppressing background noise is not needed, in which case we recommend that you stick to Zoom’s original sound. The original sound can improve the audio quality of a Zoom recording by preserving the raw audio of the speaker’s microphone. If you select any of the background suppression options, Zoom applies changes to the sound to make it clearer and reduce background noise, but this can sometimes distort the sound. You want to be careful using the Suppress Background Noise feature because you don’t want to reduce sound that doesn’t need to be touched.
Live Closed Captions
If you are wondering if you are able to add live closed captions while you are hosting a show, you’re in luck. The Live Closed Captions feature allows meeting hosts and participants to add real-time captions to their Zoom. You are also allowed to customize the captions to your liking, such as adjusting font size, and placement.
How to use Live Closed Captions feature in Zoom:
- Sign into your Zoom web portal and click on your profile.
- Go to your Settings located in the left hand column.
- Switch on “Automated captions.”
- Start the Zoom meeting and click on the “Show Captions” button at the bottom of the meeting window.
- Select the language you prefer and hit the save button.
Not only are you able to add live captioning to your meeting, there is now a translated captions feature in Zoom with options of several different languages.
The latest and greatest features on Zoom are designed to make virtual communication more seamless and effective. The Avatar feature allows users to express themselves creatively, while the Q&A feature helps facilitate more engaging and interactive shows. Sign Language Interpreters Support and Live Closed Captions enable users to connect with a wider audience. Additionally, the Suppress Background Noise feature help to improve the overall audio quality. With these new and updated features, Zoom continues to offer a reliable and user-friendly platform for virtual communication.
If you aren’t already a host at VoiceAmerica, you can look into hosting a radio show by clicking here.


